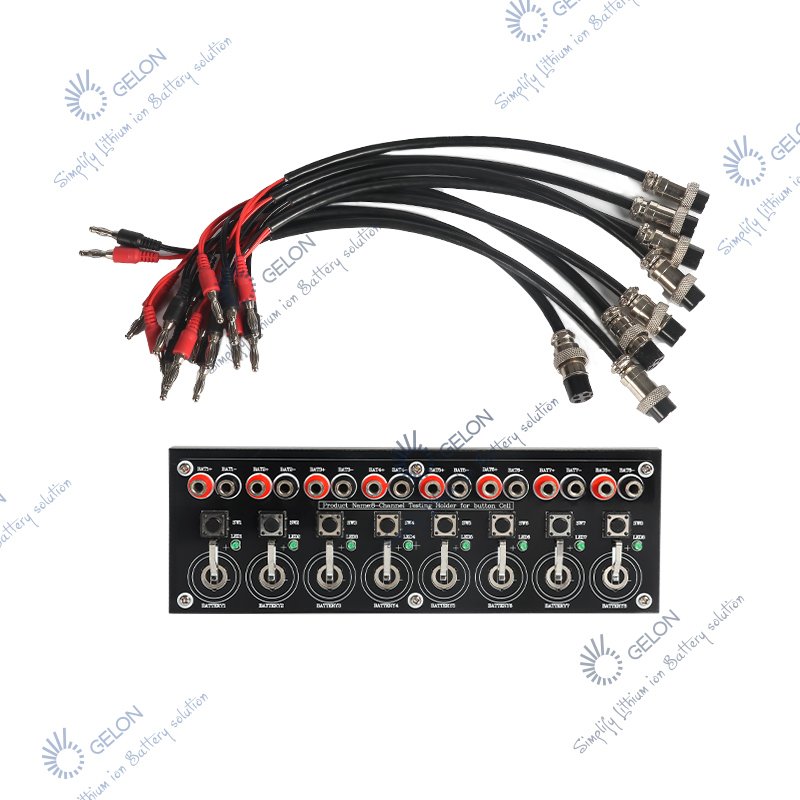
8 Channels Coin/Button Cell Testing Board
PRODUCT PARAMETERS
Description
8 Channels Coin Cell Testing Board GN-TB – Button Battery Test Holder for <25mm Cells
The GN-TB Eight-Channel Button Battery Test Holder is a versatile fixture designed for performance testing of button/coin cells with diameters less than 25mm (compatible with CR20xx series including CR2016, CR2025, CR2032, CR2430, CR2450, etc.). This test board allows simultaneous testing of 1 to 8 batteries, significantly improving testing efficiency in laboratory and quality control environments.
Physical Layout:
The test board features 8 independent channels, each clearly marked from BATTERY1 to BATTERY8. Each channel includes:
- BAT+/BAT- Binding Posts: Red terminal for positive output, black terminal for negative output
- Tact Switch (SW): Non-self-locking button for polarity/contact verification
- LED Indicator: Lights up when switch is pressed if battery is correctly installed and has power
Operating Principle:
- Battery Installation: Place the button battery with positive pole facing up into the designated annular area. Ensure the battery is centered and makes good contact with both upper and lower pole pieces.
- Polarity Verification: Press the corresponding tact switch (SW). If the LED lights up, the battery is correctly installed and has power. If not, check polarity or battery charge.
- Analyzer Connection: Connect the battery analyzer to the binding posts using appropriate cables (available separately).
- Testing: After connections are verified, set test parameters on the battery analyzer and start the corresponding channels.
Key Features:
- 8 Independent Channels: Test up to 8 batteries simultaneously with individual controls and indicators
- Quick Polarity Check: Non-self-locking switches with LED indicators for instant verification
- Universal Compatibility: Accepts all button cells with diameter <25mm (CR20xx series, CR24xx series, etc.)
- Clear Binding Post Connections: Red/black terminals for secure analyzer connections
- Easy Battery Loading: Simple drop-in design with annular contact areas
- Compact Design: Space-efficient benchtop footprint for laboratory use
Compatible Cable Options (Purchased Separately):
- Four-core aviation plug to banana connector cable
- Two pairs of alligator clips (positive/negative) with banana connector cable set
About Us
FAQs
Please send us your purchase order by email or call us sales , then we can make the proforma invoice under your request .We need to know the following information for your order before sending your PI
1) Product information–quantity ,specification(size,technological if needed and packing requirements ect.)
2) Delivery time required.
3) Shipping information–Company name, detail address, phone number, destination sea port .
4) Forwarder’s contact details if there’s any in China
It takes 1-5 days for sample order or part of inventoryequipment (depending on the requirements of the order)10-30 days for mass production orders(depending on order requirements, etc.)
Please tell us :
What's your application and your special requestof the products ?
Better to let us know what's your expect performance ?

We accept EXW, FOB, CIF,DAP etc. You can choose the one whichis the most convenient or cost effective for you.
There is a English manual for each equipment that will show youhow to use the machine If there is still any questions,Please feel free to contact us by online service,such as e-mail/skype/phone/whatsapp/wechat at any time.
- The guarantee period : One year
LiBatteryEquip is a professional supplier specializing in complete Battery Laboratory Equipment,Lithium Battery Production Line, and Battery Testing Equipment. With over 20 years of experience in lithium battery material production, and battery equipment manufacturing, we provide customized lithium battery laboratory and pilot production line solutions for various research institutions and enterprises to meet their diverse needs. Our technical and management team possesses more than 20 years of expertise in the battery-related industry, consistently committed to delivering superior products and comprehensive services to our clients.